Suture Kits 101: A Beginner’s Guide to Understanding and Using Your Kit

Have you ever watched a medical drama and wondered how doctors make those perfect stitches look so easy?
The truth is, suturing takes practice, patience, and the right tools. Whether you’re a medical or nursing student, or just curious about medical skills, learning to suture starts with understanding your practice kit.
This guide will take you through everything you need to know about suture kits. We’ll explain the different parts, teach basic stitching techniques, and offer tips to help you learn faster. From recognizing needle types to making your first simple stitch, you’ll gain the confidence to practice effectively.
Important: Suture kits are for practice only and should never be used on real wounds. Actual medical procedures require sterile environments and professional nurse training.
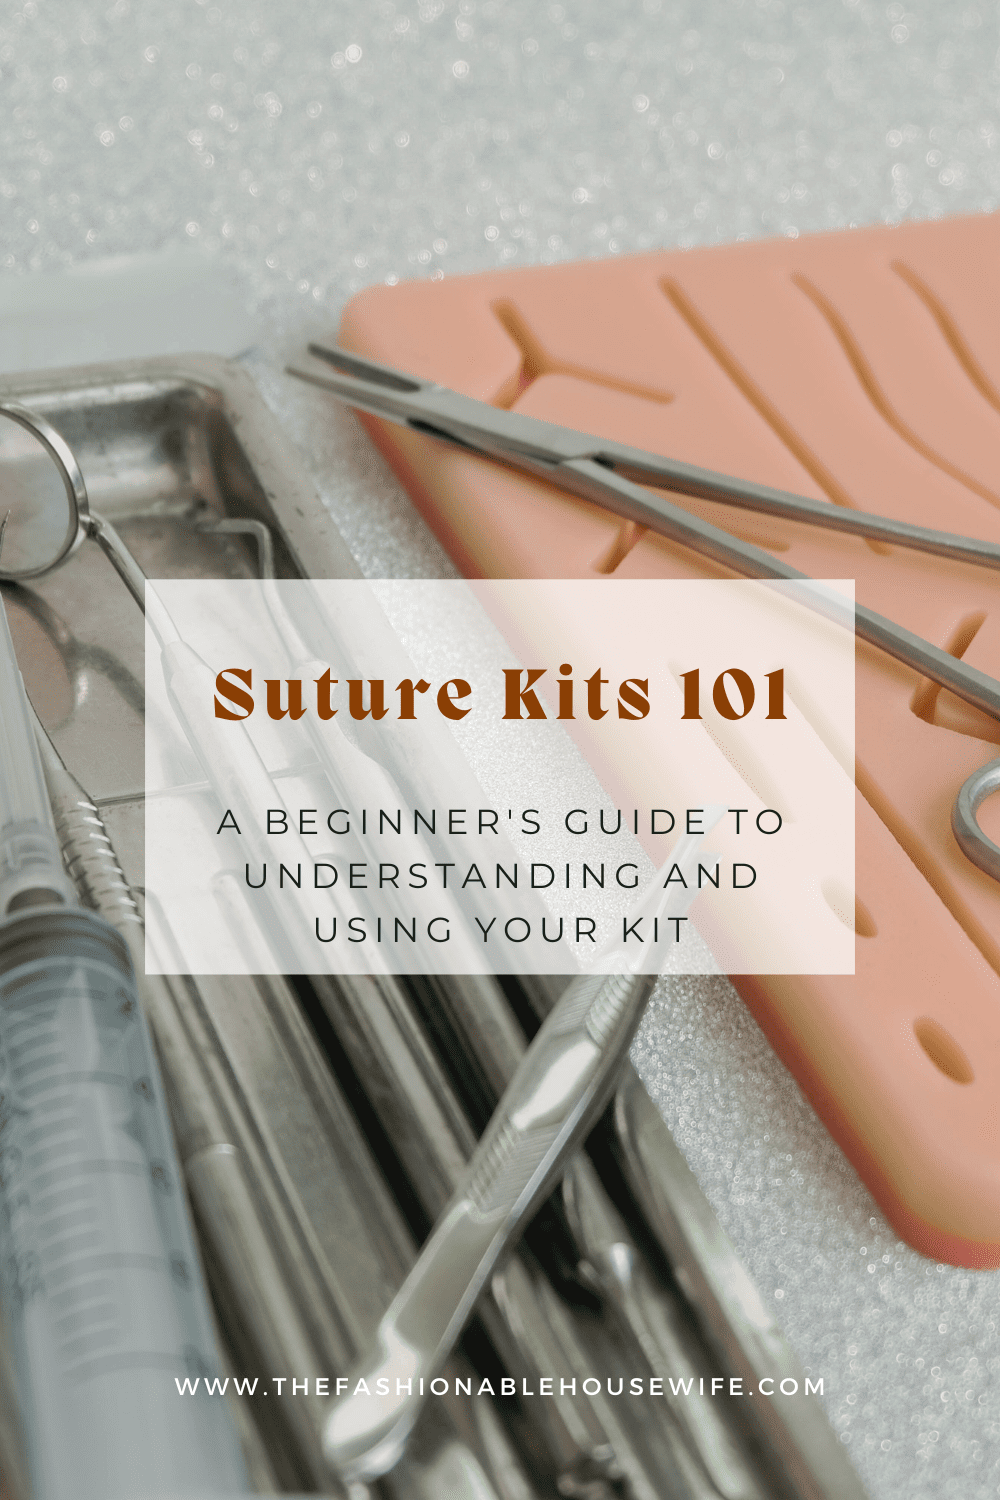
Anatomy of a Suture Kit
Understanding your tools is the foundation of successful suturing practice. Each component serves a specific purpose, and knowing how they work together will dramatically improve your technique.
Needles and Threads (Sutures)
The core of any suture kit is its needles and threads—precision tools made for medical use.
Threads come in two types: absorbable sutures that dissolve inside the body, ideal for internal tissues, and non-absorbable sutures that stay until removed, used mostly for skin closures.
Needle choice matters too. Curved needles fit wrist movement and are most common, while straight needles need different handling. Needle tips vary as well—cutting needles pierce tough skin, and tapered needles glide through delicate tissue.
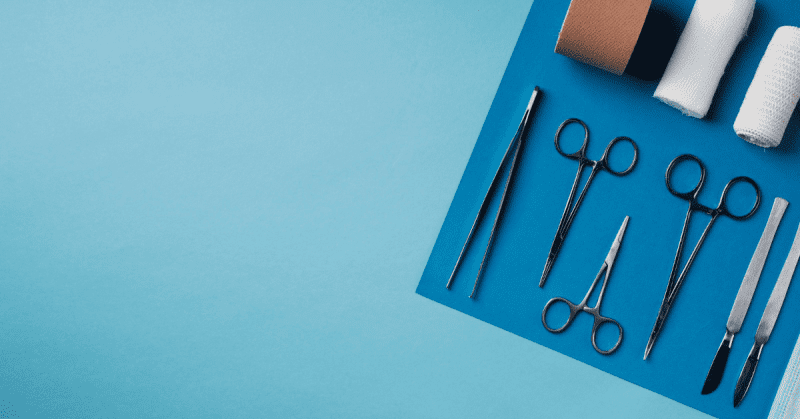
Needle Holders
Needle holders are special pliers that grip suture needles firmly, giving you the precision needed for accurate stitching.
To hold them properly, place your thumb and ring finger in the handles, and rest your index finger along the shaft for extra control. This grip helps you move smoothly while keeping a secure hold on the needle.
Most needle holders have a lock that clamps the needle in place, freeing your other hand to work on the tissue or adjust your position. Practice locking and unlocking until it feels natural to improve your efficiency.
Forceps
Forceps act as your “third hand” during suturing, helping you hold and position tissue with precision.
There are two main types: toothed and smooth. Toothed forceps have small teeth that grip tough tissue like skin firmly but need careful handling to avoid damage.
Smooth forceps, also called tissue forceps, have a gentle surface ideal for delicate tissues or handling sutures, reducing trauma while maintaining control. Using the right forceps ensures better precision and less tissue injury during suturing.
Scissors
Suture scissors may seem simple, but they’re designed for precise cutting in tight spaces. Their curved or angled blades let you cut threads close to knots without harming nearby tissue.
Sharp scissors make clean cuts that prevent fraying, while dull ones need more force and can pull on stitches, risking damage. Keeping your scissors sharp and clean ensures the best results.
Practice Pad
The silicone practice pad closely mimics the texture and resistance of human skin, making training feel realistic. Unlike foam or fabric pads, silicone provides consistent tension similar to real tissue.
These pads often have multiple layers to help you practice suturing at different depths. Some even include pre-made wounds of various sizes and shapes for varied practice. Thanks to silicone’s durability, these pads can handle hundreds of stitches before wearing out.
Basic Suturing Techniques for Practice
Now that you understand your tools, let’s dive into fundamental techniques that form the foundation of all suturing skills.
The Simple Interrupted Stitch
The simple interrupted stitch is the foundation of suturing. Mastering it sets you up for more advanced techniques.
Begin by holding the needle holder about one-third from the needle’s tip. Insert the needle straight into the practice pad about 5mm from the wound edge. Push the needle through in a smooth curve, following its shape.
Bring the needle out on the opposite side, keeping the same distance from the edge. Pull the thread through, leaving about 2 inches of tail—this will help when tying your knot.
Repeat these steps for each stitch, spacing them evenly. Each stitch stands alone, so if one fails, the others still hold.
The Continuous Stitch
The continuous stitch, or running stitch, uses one long thread to close a wound quickly and create a tight seal.
Start with a regular interrupted stitch, but don’t cut the thread after your first knot. Instead, keep stitching at even intervals, keeping the same depth and spacing. The thread will form a spiral along the wound.
It’s important to control the tension—too tight and the skin puckers, too loose and the wound won’t close well. Practice keeping steady, even pressure for the best results.
Tying the Surgical Knot
Proper knot tying is key to keeping your sutures secure. The surgical knot offers more hold than regular knots.
Start with the long end of the thread and wrap it twice around your needle holder. Then, grab the short tail and pull it through the loops—this is your first throw, adding extra friction.
For the second throw, wrap the long end once around the needle holder and pull the short end through again. This double wrap followed by single wraps creates a strong surgical knot that resists loosening under tension.
Tips for Successful Practice
Developing proficient suturing skills requires more than just understanding techniques. Your approach to practice determines how quickly you’ll progress and how solid your foundation becomes.
Start Slow and Be Patient
Speed comes with practice, but accuracy takes conscious effort. In your early sessions, focus fully on perfecting your technique. Make each movement deliberate and controlled.
It’s fine to time yourself sometimes to see progress, but never rush at the cost of quality. While emergencies may call for quick suturing, mastering proper form first ensures your fast stitches will be strong and effective.
Use Proper Form
Your posture impacts both precision and stamina. Sit up straight with relaxed shoulders, and place your practice pad at a comfortable height. Good lighting helps you see clearly without shadows.
Hand positioning is just as important. Keep your wrists steady and rely on finger movements for fine control. Avoid gripping tools too tightly—tension in your hands can cause shaky, less accurate movements.
Practice Consistently
Muscle memory grows with regular practice, but long, infrequent sessions aren’t as effective. Practicing for 20 minutes daily beats three hours once a week.
Set clear goals for each session—one day focus on even stitch spacing, another on faster knot tying. Targeted practice helps improve weaknesses faster than random repetition.
For students and beginners looking to enhance their suturing skills, the Artagia Med Suture Kit offers a safe and practical solution. Crafted from quality materials, it provides an effective way to gain hands-on experience.
Final Thoughts
Mastering suturing opens the door to many essential medical skills. Practicing with your kit builds confidence, dexterity, and the precise hand movements needed in healthcare.
Remember, every expert started where you are now. The skilled surgeons you admire spent countless hours practicing these basic stitches on similar tools. Your consistent effort will bring you to that level too.
Using quality equipment makes learning easier and more enjoyable. A good suture kit gives you the right tools to develop proper technique from the start.
Ready to begin? Start with short, focused practice sessions and gradually improve. With patience and consistency, you’ll soon create precise, professional-quality sutures that showcase your growing expertise.