Crafts For Kids: Tissue Paper Stained Glass Thanksgiving Turkey

Thanksgiving seems to be a holiday slighted by its position between Halloween and Christmas. If it doesn’t give us candy to eat or a present to open, it’s not something to get much excited about. That’s a little sad, isn’t it? Thanksgiving is a wonderful holiday. We get to visit with friends and family we haven’t seen all year. If we go home we get to tramp through our old stomping grounds and catch the parade (it might be all fire engines, but that’s okay).
The leaves change color, it’s finally scarf-and-boot weather, and the long-anticipated Starbucks Red cup is finally out. But for a lot of people, it’s just not enough. We can change that. You can change that. Do you want to get your kids excited about fall and make new holiday traditions? This craft can help get your plans off the ground, and no, it doesn’t include a turkey handprint.
The Kid-Friendly Stained Glass Turkey
Part of the fun of Halloween and Christmas are the crafts we get to make. Jack-O-Lanterns, mummies, snowflakes and ornaments, we’re not left wanting for ideas. But when it comes to Thanksgiving, there’s only so much you can do with a painted turkey handprint. I think it’s safe to say that every young adult in America has a faded turkey handprint tucked away in the keepsake box their mothers stored away in the attic.
We can do something different AND still respect the turkey craft tradition, starting with reinventing the turkey.
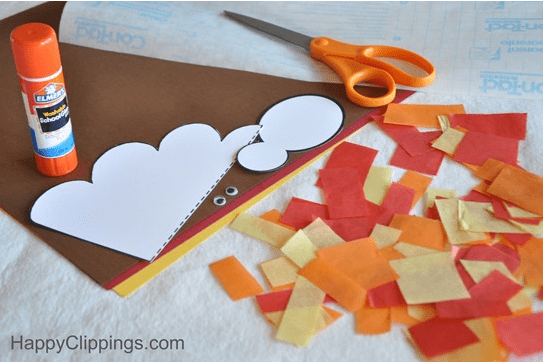
Materials Needed:
- Tissue paper (red, yellow, orange)
- Googly eyes
- Construction paper (brown, orange, red)
- Scissors
- Clear contact paper
- Glue stick
- Pencil
- Exacto knife
- Wire
- Suction cup
Directions:
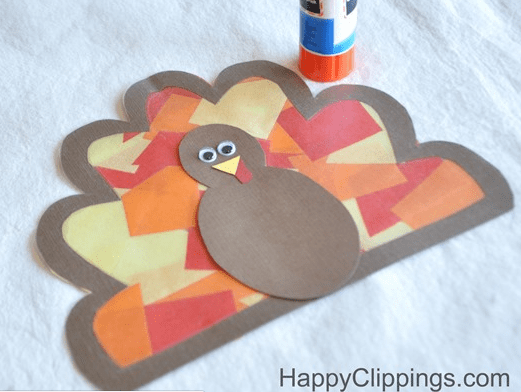
Step 1: Draw two circles (one small, one large) on the brown construction paper and cut them out with your scissors, set aside. These circles will be the head and body of the turkey.

Step 2: Draw a “cloud” shape with seven humps on the brown construction paper. The bottom of the “cloud” should be straight-edged. Draw the same pattern inside the “cloud.” Cut out the pattern inside the first pattern. Keep the first pattern, it should now be without its middle. Set aside. If this seems like it might be too complicated for your child, download the Happy Clippings turkey template here.
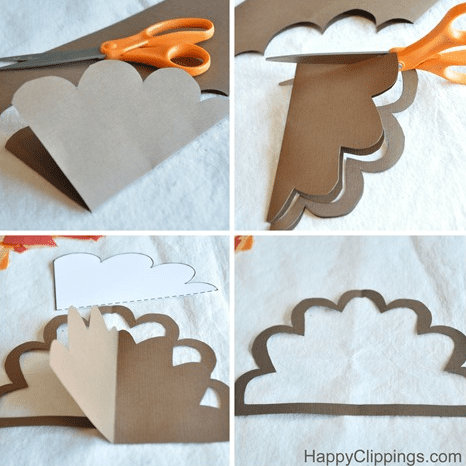
Step 3: Draw small triangles on the orange construction paper and small rectangles on the red construction paper. Cut out the shapes and set aside.
Step 4: Cut the yellow, orange and red tissue paper into irregular shapes and sizes. Set aside.
Step 5: Take your “cloud” (this will be the outline of the turkey feathers) and place it on the adhesive side of the clear contact paper. Fill in the empty space with the tissue paper cut-outs.
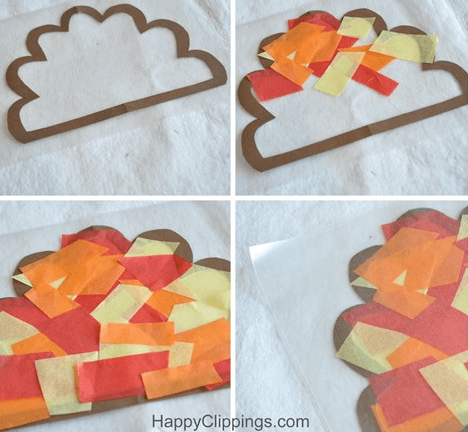
Step 6: Fold the contact paper over the “feathers” and flatten with the palm of your hand. Cut around the outline of the turkey feathers to remove the excess contact paper.
Step 7: Glue the large circle you cut out in Step 1 onto the flat bottom of the feather outline. Glue the small circle on the top of the large circle.
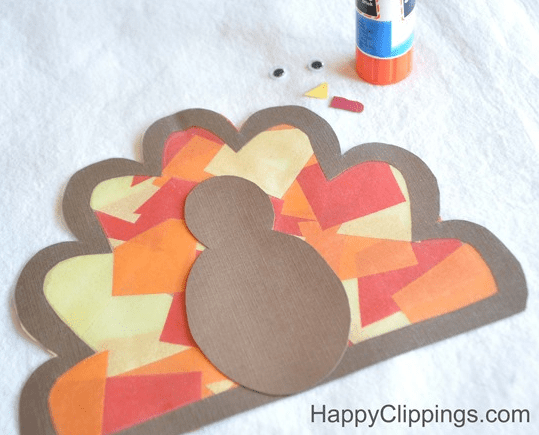
Step 8: Glue the rectangle lengthwise in the middle of the small circle. Layer and glue the orange triangle over the rectangle. These are the turkey’s gobbler and beak.
Step 9: Glue the googly eyes just above the beak.
Step 10: Using the exacto knife, make a small incision at the top of the turkey’s middle feather. Thread wire through the hole.
Step 11: Wrap the end of the wire around the suction cup nub. The wire should connect the turkey and the suction cup, leaving the turkey hanging from the wire.
Step 12: Stick the suction cup to the window and watch as the sun’s rays pour through the dapper bird!
This Thanksgiving craft is fun, makes cute gift ideas, and will keep the kids entertained for hours. You can make several different types of birds and have your very own aviary!
Image Source: https://www.happyclippings.com/